Showing posts with label gluten-free. Show all posts

Monday, September 19, 2022

Fabulous Time at the Foraging and Feasting Workshop at Frick Park


Yesterday at Frick Park we had a fabulous time at our Fall  Foraging and Feasting Workshop! Fourteen lovely people plus one adorable baby joined us as we took a walk around the park discussing edible and medicinal uses of common plants, then foraged wild greens, flowers, and herbs to add to our lunch. We made our own wild herbal butters (we used vegan butter) by mixing plants like wood sorrel, goldenrod flowers, smartweed flowers, ground ivy, Asiatic dayflowers, and herbs growing at the center: basil, chives, rosemary, thyme, mint (each participant got to choose their own combination!)


Then they cooked their own bread over a fire:


...while I added the wild greens and herbs to our delicious vegan White Bean Potato Lentil Soup:


I added goldenrod leaves, dayflower leaves, wood sorrel leaves, chives, rosemary, and the rest of the goldenrod flowers that we harvested for the butter. The beauty of a soup like this (or any soup which has "spinach" as an ingredient) is that instead of the spinach, you can add any wild greens that are in season. I'll include the recipe below.

It was such a fantastic day! Some of the plants (and mushrooms) we saw and discussed were:

Edible/Herbal Plants:
  • Wild Carrot/Queen Anne's Lace (Use caution! has poison look alikes including Poison Hemlock, Water Hemlock, and White Snakeroot)
  • Boneset (Use with the utmost of caution! Poison look-alike is White Snakeroot)
  • Goldenrod
  • Wood sorrel
  • Plantain (Plantago major)
  • Lambs Quarters
  • Purslane
  • Ground Ivy/Creeping Charlie
  • Broad-leaf dock leaves and seeds
  • Mugwort
  • Asiatic Dayflower
  • Smartweed
  • Deadnettle
  • Acorns
  • Black Walnut
Edible/Herbal Mushrooms included:
  • Turkey tail
  • Various boletes
  • Various polypores
  • Aborted entoloma
Poisonous/Non-edible/Allergen Plants Included:
  • White snakeroot (poison)
  • Pokeweed/Pokeberries (poison, though earliest shoots are edible in spring, properly prepared)
  • Ragweed (common allergen)
We identified and discussed various trees:
  • Black Walnut
  • Oaks, distinguishing white oaks from red/black
  • Tulip poplar
Herbs growing at center:
  • Thyme
  • Basil
  • Chocolate Mint
  • Rosemary
  • Chives

As you can see we had a busy day of discovery, fun, learning, and feasting!

Recipe for White Bean Potato Soup: (gluten-free, oil-free, vegan)

I will tell you the ingredients I used, but I was cooking for 20 people, so I won't share the amounts! You'll have to use your judgment when making the soup. It is a thick creamy soup though, so don't skimp on the beans and potatoes!

I used an instantpot and dried beans for this recipe, cooking the (unsoaked) beans first for about 45 minutes, then adding the rest of the ingredients and cooking for 15 more. I added the red lentils with the vegetables for the second cooking, since they do not take as long to cook as white beans and chickpeas. You can use canned beans, in any combination, even choosing to use all white beans. I'll share a secret: I only added the chickpeas and red lentils because I ran out of white beans. But the red lentils really added a lot to the soup, and took the flavor to the next level, so if you have them, I would recommend using them.

Ingredients:
  • white beans, I used dry, you can use canned
  • chickpeas (aka garbanzo beans), I used dry, you can use canned
  • red lentils (dry)
  • onion (I used red onion because it's what I had)
  • garlic
  • celery
  • carrot
  • Better Than Bouillon, seasoned vegetable base
  • Potatoes (I used yellow because it's what I had, you can use any kind)
  • Salt and pepper to taste
  • Seasonal wild greens, herbs, and flowers of your choosing! We used: goldenrod leaves and flowers, smartweed greens, Asiatic dayflower greens, wood sorrel, deadnettle, lambsquarters
Directions:

  1. In an instant pot/pressure cooker: cook white beans and chickpeas for 45 minutes on high pressure. If you don't have an instant pot, you can use canned beans or soak the beans overnight and cook on stove for half an hour before adding other ingredients.
  2. Add all other ingredients except wild greens with just enough water to cover. Cook 15 more minutes. If you don't have a pressure cooker, cook until potatoes and carrots are soft.
  3. When finished cooking, use a potato masher to mash enough of the beans and potatoes to make the soup nice and creamy.
  4. Add the wild greens, herbs, and flowers while soup is still hot. Cook at least 5 more minutes until greens are wilted.
  5. Season to taste.
  6. ENJOY!


Please join me on patreon where I will be adding slides and information of all the wild plants we saw over the next few weeks.

Hope you are enjoying the fall!

~ Melissa

Saturday, April 29, 2017

Recipe: Dandelion Tea Cake

dandelion flowers

Dandelions! Dandelion flowers aren't as bitter as the green leaves, and they are easier to harvest and use than the root. I like to put dandelion flower petals (I remove the green collar, see below) in all kinds of batter: pancake, scone, cookie, you name it! 

Last year my daughter and I made this delicious Dandelion Tea Cake: it's a sweet bread, like zucchini bread but with dandelion flowers. We made ours gluten-free and dairy-free...and it was delicious! 

Perfect served with honey and tea.

piece of cake with honey


dandelion tea cake

The first step is to gather lots of dandelion flowers.
Next, remove and compost the green collar, saving the yellow flower petals, until you have 1 1/2 cups.

dandelion flowers

Then, gather your ingredients and put it all together.

Enjoy!

Ingredients:

  • 2 cups buckwheat flour (I ground buckwheat grouts in a coffee grinder)
  • 2 tsp baking powder
  • 1/2 tsp salt
  • 1 1/2 cups dandelion petals
  • 1 mashed banana with drizzle olive oil (I used in place of 1/4 c veg oil)
  • 1/2 c maple syrup
  • 1 egg, beaten
  • 1 1/3 cup cashew milk
  • 1 tsp vanilla


Directions:
  1. preheat oven to 400 F
  2.  mix dry and wet ingredients separately (dandelion petals with dry ingredients) then mix together
  3. Pour into oiled loaf pan. bake 25 minutes on 400 F
  4. turn down to 350 F and bake 20 more minutes.
dandelion cake

Tuesday, March 21, 2017

Making Homemade Nettles Pasta

nettles

One of my favorite early spring greens is stinging nettles (Urtica dioica.) Ella and I have been making pasta out of nettles since she was four. I believe I originally from another herbal website (possibly Herb Mentor?) but as I search now I cannot find it to link to, so I am sorry that I cannot give you an original source. However, we did change it: we ground buckwheat to use as our flour making the noodles gluten-free.

buckwheat and flour

Let me share our spring ritual with you.
  1. Harvest young stinging nettles. You'll need three cups of chopped fresh nettles (which will steam way down) for the pasta. *When harvesting and chopping fresh nettles, you may want to use gloves to avoid being stung.*
  2. We are gluten free so we like to make our own flour, which we do easily in our high speed blender. Today we ground buckwheat groats into flour and used 2 cups, plus extra for kneading on. Rice flour also works well.
  3. Place steamed nettles and two eggs into a blender and mix.
  4. On a table or in a bowl, make a pile of flour with a well in the middle.
  5. Put the nettle/egg mixture in the well and mix/knead into the flour
  6. If too sticky, add more flour.
  7. Place dough ball under wet cloth and let it "rest" for 15 minutes.
  8. Cut about a fourth of the dough off and roll it out on a floured surfaced as thinly as possible. (If you have a pasta maker by all means use it!) Cover the dough you are not rolling with the wet cloth.
  9. Cut into strips and set aside as you continue to roll and cut all the pasta.
  10. Place the pasta in boiling water and cook about 3 minutes (fresh pasta does not need much time to cook.)
  11. Drain pasta. I returned it to the pot and added some butter, fresh chopped tomatoes and salt while I sauteed the rest of the veggies, which I then mixed in.
pasta

In a separate pan in butter, saute 1/2 large onion, 1 clove garlic, 1/2 cup chopped mushrooms and 1 cup chopped fresh nettles. (You may want to use gloves while chopping the nettles.)

Mix into noodles, add salt to taste and enjoy!

girl rolling dough
Happy Spring!

~ Melissa

Wednesday, October 19, 2016

Recipe: Puffball Nuggets

puffball mushroom
Calvatia gigantia - Giant Puffball Mushroom
 Giant Puffball! So exciting and fun to find!!

girl holding puffball


Here is my friend Trish last year on our bike to DC, finding some:

woman with puffball

And yet, with their marshmallow-like inside, the texture when cooked (sauteed) is not the best. Sort of mushy and lackluster...not really my favorite mushroom. 

That is, until today!

breaded puffball nuggets

I found if you put the crunch on the outside, it doesn't matter so much if it's soft on the inside. In fact, it's better that way!

Because I am doing a vegan oil-free type diet right now (a la Forks Over Knives) I knew I didn't want to saute these in oil or butter. But what else could I do?

That's when the old noggin took over and voila, deliciousness was born. These are such tasty puffball nuggets I am hoping I find more out there this season!

Recipe: Puffball Nuggets

vegan, gluten-free, oil-free

1. Preheat oven to 375 F.

2. Get two bowls. In one, put tamari (gluten-free soy sauce) and water in equal amounts. In the second, make the "breading."

Breading 1


  • rice chex-type cereal
  • nutritional yeast
  • black pepper
  • dried basil
  • dried thyme
  • dried parsley
  • dried cilantro


Crush the cereal and mix everything together. You can add or omit spices as you have them or to your taste. I did not put salt in because the tamari is salty.

Breading 2:


  • blue corn chips 
  • nutritional yeast
  • cumin
  • tumeric
  • dried coriander
  • chili powder
  • cayenne pepper


Again, mix and match spices as you like. I was going for a Mexican theme with the corn chips. You can also use yellow or white corn chips. Crush corn chips (I used a spice/coffee grinder) and mix with spices and nutritional yeast.

3. Now, take your puffball:


  • Slice it 
  • Peel it (peel the outer skin away from the marshmallow-y inside, it easily comes off, but you can also cut it off if you want. I peel each slice rather than trying to peel the whole mushroom before I've cut it!)
  • Cut it into "nugget" or "finger" sized pieces


4. Take each piece and first dip into the tamari mixture:

cut mushroom

5. Then dip it into breading:
mushroom and breading
6. Place onto a tray covered with parchment paper:

mushrooms on tray

7. Bake 18 minutes, flip pieces over and bake another 15 minutes.

8. Enjoy!!! You will! They are so good!!

I preferred Breading 1:

breaded nuggets
While my husband preferred Breading 2:

breaded nuggets
Now... to find more giant puffballs!
woman with mushroom
Happy foraging!

~ Melissa

Tuesday, October 18, 2016

Recipe: Sunchoke Soup

sunflowers


Digging up Sunchoke tubers is easy. They grow just below the surface and can ofen be pulled out in droves, without harming the flower patch at all. 

Sunchoke (Helianthus tuberosus), aka Jerusalem Artichoke, are a native plant that blooms in the fall. You will often find them on the side of the road, in fields and forests. The stems and leaves feel like sandpaper to the touch. Below the surface you'll find the knobby tubers.
Jerusalem artichokes
These are delicious and were a staple in the diet of Native Americans and early settlers. This hardy, nutritious and delicious tuber can be dug from the ground year round, as long as the ground is not frozen solid. They store well in the refrigerator or root cellar (but actually store best right in the ground, so only try to store them for the months when the ground is actually frozen, around here that is January and February.)

The name "Jerusalem artichoke" is somewhat of a mystery, since they are not artichokes and are not from Jerusalem (it is a native American plant.) The theory is the Italian and Spanish word for sunflower is Girasol, which sort of sounds like "Jerusalem." And I suppose they do taste a bit like artichokes, though they are unrelated. Most people now have returned to calling them "Sunchoke" though you'll hear both names.

They can be eaten raw or cooked almost any way you can think of: roasted, fried, steamed, boiled, simmered.  

Here is a ver simple, easy way of making soup from Sunchoke tubers.

Recipe: Sunchoke Soup

Ingredients

  • 1 onion, chopped
  • 5 - 7 large sunchoke tubers, washed well, peeled half-heartedly (don't worry about getting all the peel off), and chopped (about 2 cups)
  • water or stock to cover vegetables
  • 1/4 cup cashews
  • 3 Tbsp nutritional yeast (optional, good if not using vegetable stock)
  • sea salt
  • black pepper
  • 1 Tbsp olive oil
soup

Directions

  1. Saute onion in olive oil.
  2. Add sunchoke tubers and continue to saute, adding some salt, to bring out flavors.
  3. Cover with water or stock and let simmer until sunchokes are soft, about 20 minutes.
  4. Place in blender with cashews, nutritional yeast, sea salt and pepper. Whizz til smooth.
  5. Reheat and add more salt and pepper if necessary.
This soup is simple and delicious!!!

Enjoy!
~ Melissa

Wednesday, June 1, 2016

Purslane Is Up! Gandhi's Kachumber Salad

Purslane is coming up! This healthy "weed" is delicious and versatile. It's high in Omega 3 fatty acids (unusual for a green plant) and is wonderful simply tossed into salad or eaten right out of the garden (where it's likely growing as a weed) or off the trail. Another great thing about purslane - it's here until fall. Enjoy the following information and recipe saved from the old blog!

purslane

One of Gandhi's favorite foods was a weed: purslane! He urged his followers to learn about wild plants and eat the weeds that grow around them as a way of empowering the people. In honor of Gandhi and purslane, I created this delicious Indian spice inspired salad: Purslane Kachumber Salad. I've used a spice blend called "Chaat Masala," which is available in Indian grocery stores and is largely dried mango, salt, cumin and other spices. If you don't have access to this spice, you can substitute cumin, coriander and cardamon (amounts below) or leave the spices out entirely. This salad is delicious with just salt, pepper, lemon juice and olive oil.

Purslane Kachumber Salad

Ingredients:
  • Purslane, leaves pulled off and stem chopped (we are using both the leaves and chopped stems in this recipe)
  • 1 - 2 Tbsp red onion, chopped (as much or little as you like, to taste)
  • 1 cucumber, chopped
  • 1 large tomato, chopped
  • 1/2 tsp chaat masala (optional, see above note. can substitute 1/4 tsp cumin, 1/8 tsp coriander, 1/8 tsp cardamon or omit spices entirely.)
  • Juice of 1/2 lemon
  • 2 Tbsp olive oil
  • salt and pepper to taste
Directions:

Whisk lemon juice and spices (if using) together, and add olive oil. Whisk until mixed well.
In separate bowl, mix purslane leaves and stems, tomatoes, cucumber and onion.
Top with dressing, add salt and pepper to taste.
Mix well and enjoy!

~ Melissa Sokulski

Wednesday, May 4, 2016

Garlic Mustard Pesto

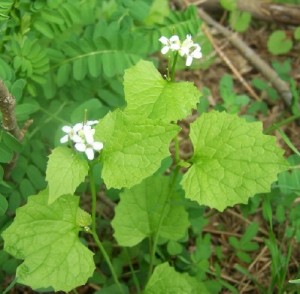
Garlic Mustard is an invasive plant, brought to America as a culinary herb in the 1860's. Many local and state parks have volunteer days spent pulling this invasive herb out. By all means pull it up from your garden...but don't be so quick to throw it in the compost! This is a delicious plant and early spring is when its flavor is at its best.


The leaves become bitter as the weather gets hot, so they are best collected in early spring and summer. Leaves can be collected either from the ground rosettes (pictured above) or from the stalk. Garlic Mustard leaves become more triangular when the plant bolts, and the leaves come up the flower stalk of this small four-petaled flower (unlike dandelion, whose leaves stay on the ground as the flower stalk is sent up).


Notice the 4-petaled white flowers blooming at the top of the plant. The leaves climb up the flower stalk and become more triangular once the plant flowers. 

You can eat garlic-mustard leaves both before and after it flowers. The leaves, flowers, and root are edible (the root tastes like horseradish!)

Flowers and chopped leaves can be added to salads for a nice pungent garlic flavor.

One of my favorite ways of eating garlic mustard is making pesto. Use your favorite pesto recipe and swap garlic mustard for fresh basil. If you don't have a recipe on hand, try this one. Pesto can be enjoyed on pasta, spread on crackers or tomatoes, on sandwiches, pizza..any way you can think of!


Garlic Mustard Pesto

* 2 cups garlic mustard leaves, washed and patted dry
* 1 small garlic clove, peeled
* 1/4 cup olive oil
* 2 Tbsp pine nuts, lightly roasted on stove top (can roast walnuts in place of pine nuts)
* 3 Tbsp grated Parmesan cheese
* 1 Tbsp lemon juice
* sea salt to taste

In a food processor, blend garlic and garlic mustard while drizzling in olive oil.

Add pine nuts, cheese, lemon juice and a little salt and blend.

Taste and add salt if necessary.

I mixed some into gluten-free pasta with more roasted pine nut and a chopped tomato. It was excellent!

Here's to wild foods!

Melissa Sokulski
Food Under Foot


Monday, May 2, 2016

Wild Mushroom Soup

This is a great time of year: Morel Mushrooms! And while you are out looking for morels, you may find some gorgeous dryad saddles, growing on dead wood. Here is a delicious, vegan "creamy" wild mushroom soup that incorporates both (but you can really use ANY mushrooms in this soup!)


soup

This  amazing vegan "cream" of mushroom soup...and the mushrooms are MORELS and DRYAD'S SADDLES! It doesn't get better than this!


morel mushrooms


Vegan Cream of Wild Mushroom Soup

vegan, gluten-free, soy-free

In a pot with water, boil:
  • 3 potatoes, peeled, chopped
  • 2 carrots, chopped
  • 3 stalks celery, chopped
  • 1/2 onion, chopped
  • 4 cloves garlic
  • 5 button mushrooms (optional)
  • salt
  • pepper
  • paprika
Boil until POTATOES and CARROTS are tender. Remove from heat.
Add 1/4 cup raw CASHEWS or cashew pieces and blend well. (We used our vitamix, but any blender should be fine.)

In a pan with olive oil:

saute chopped MORELS with salt.

In another pan with olive oil:

saute chopped DRYAD'S SADDLE with salt.

wild mushrooms

(I sauteed in them in two separate pans because later in the season dryad's can become bitter, and in case this had happened, I didn't want to ruin the batch of morels!!! But they were just fine.)

Return now creamy broth to pot and adjust seasonings: SALT, PEPPER, PAPRIKA  to taste.
Add sauteed mushrooms and enjoy.

PLEASE MAKE 100% CERTAIN OF IDENTITY OF ALL WILD MUSHROOMS USED!
~ Melissa
Food Under Foot

Saturday, April 30, 2016

Let's Make Dandelion Tea Cake

cake

Originally called "Dandelion Bread," I changed the name of the recipe to Dandelion Tea Cake, because this is much more cake-like than bread-like (think Zucchini Bread.)

The original recipe is from the Food Storage and Survival Blog.

I altered it a bit to make it gluten-free, dairy-free and practically oil-free.

dandelion flower petals

First you'll need to gather a lot of dandelion flowers, which shouldn't be too hard this time of year! Then pinch off the green underpart and toss the yellow petals into a bowl. It's ok if there is a bit of green here and there, but the greens are bitter, so the more you can remove the better.

Ingredients:
  • 2 cups buckwheat flour (I ground buckwheat grouts in a coffee grinder)
  • 2 tsp baking powder
  • 1/2 tsp salt
  • 1 1/2 cups dandelion petals
  • 1 mashed banana with drizzle olive oil (I used in place of 1/4 c veg oil)
  • 1/2 c maple syrup
  • 1 egg, beaten
  • 1 1/3 cup cashew milk
  • 1 tsp vanilla extract
Directions:
  1. Preheat oven to 400 Fahrenheit.
  2. Mix dry ingredients, including dandelion petals, into bowl.
  3. Mix wet ingredients in another bowl, then combine with dry ingredients.
  4. Pour into oiled loaf pan.
  5. Bake at 400 for 25 minutes, then turn down heat to 350 and bake 20 more minutes.
Delicious served warm with tea. I boiled the extra dandelion flowers (greens and all) into a tea, to which I added a little honey.
I ate it plain, but it is also good topped with honey or butter.

cake with honey

Tea Time!!!
Happy Foraging!
~ Melissa Sokulski
Food Under Foot

Thursday, April 28, 2016

Juicing Japanese Knotweed

Today we found another big patch of Japanese Knotweed (Polygonum cuspidatum, or Fallopia japonica) in our neighborhood, and we decided to try juicing it!


japanese knotweed

Here is a closer picture of the shoot coming up out of the ground. You'll notice the many joints (poly = many, gonum = knees) along the stalk.
knotweed stalk

We stripped the heart shaped leaves from the stalk, which is the part we wanted to juice. The stalk is mottled, or speckled with red, and hollow:

hollow stalk

The stalks can be peeled, which is definitely recommended if you are eating it raw, or even preparing it by steaming. The outer part is very stringy and tough.

peeling knotweed

Since we were putting them though a juicer, though, we did not peel all the stalks. Here they are in the sink being washed:

knotweed stalks

Here is Ella juicing them:

girl juicing knotweed

The result was a vibrant green tart tasting juice. It would have been fine to drink on it's own, but we added some juiced apples. Though the apples we added were red (gala, I believe) the result tasted exactly like juice from Granny Smiths - very delicious!

knotweed juice

Japanese Knotweed contains resveratrol, which is a beneficial nutrient for the heart and brain. Resveratrol is what makes drinking red wine beneficial, though there is more resveratrol in Japanese Knotweed than red wine. The resveratrol supplements are usually made using Japanese Knotweed. The concentration is highest in the roots, but is still present in the stalk.

People have also begun using Japanese Knotweed as prevention and/or treatment for Lyme's disease. For more information on this check out Stephen Herrod Buhner's book Healing Lyme, which you can find, along with other information about Japanese Knotweed and Lyme disease, at his website, Buhner Healing Lyme.

Now is the time to harvest Japanese Knotweed, if you are interested in steaming, munching on, or juicing the stalks! Best to get them as young shoots, before they become tough and woody, which will be in about a month.

Enjoy!

~ Melissa Sokulski