Wednesday, June 1, 2016

Purslane Is Up! Gandhi's Kachumber Salad

Purslane is coming up! This healthy "weed" is delicious and versatile. It's high in Omega 3 fatty acids (unusual for a green plant) and is wonderful simply tossed into salad or eaten right out of the garden (where it's likely growing as a weed) or off the trail. Another great thing about purslane - it's here until fall. Enjoy the following information and recipe saved from the old blog!

purslane

One of Gandhi's favorite foods was a weed: purslane! He urged his followers to learn about wild plants and eat the weeds that grow around them as a way of empowering the people. In honor of Gandhi and purslane, I created this delicious Indian spice inspired salad: Purslane Kachumber Salad. I've used a spice blend called "Chaat Masala," which is available in Indian grocery stores and is largely dried mango, salt, cumin and other spices. If you don't have access to this spice, you can substitute cumin, coriander and cardamon (amounts below) or leave the spices out entirely. This salad is delicious with just salt, pepper, lemon juice and olive oil.

Purslane Kachumber Salad

Ingredients:
  • Purslane, leaves pulled off and stem chopped (we are using both the leaves and chopped stems in this recipe)
  • 1 - 2 Tbsp red onion, chopped (as much or little as you like, to taste)
  • 1 cucumber, chopped
  • 1 large tomato, chopped
  • 1/2 tsp chaat masala (optional, see above note. can substitute 1/4 tsp cumin, 1/8 tsp coriander, 1/8 tsp cardamon or omit spices entirely.)
  • Juice of 1/2 lemon
  • 2 Tbsp olive oil
  • salt and pepper to taste
Directions:

Whisk lemon juice and spices (if using) together, and add olive oil. Whisk until mixed well.
In separate bowl, mix purslane leaves and stems, tomatoes, cucumber and onion.
Top with dressing, add salt and pepper to taste.
Mix well and enjoy!

~ Melissa Sokulski

Saturday, May 14, 2016

Camping and Foraging

We love camping at Food Under Foot, and we know we have lots of readers who enjoy camping and foraging. Camping is a fantastic time to find and use wild edibles.

face carved into tree stump

There are some things to be aware of: not all parks want you to pick plants, so find out the rules at each park. Some parks do not mind if you pick invasive weeds like garlic mustard, burdock, Japanese Knotweed and will even spray or pull these themselves, so it's worthwhile to ask. We've come across parks where they don't want you to pick any plants (although mushrooms are usually ok), to others who will say weeds such as the ones mentioned above are ok to pick.

We also never pick endangered or protected plants like Trillium, Ferns, or Goldenseal.

When we do harvest plants to eat we only pick what we will eat immediately, so as not to overpick or waste anything. When we are harvesting something like garlic mustard or burdock root from places where they tell you it's ok (sometimes they'll be thrilled!) we sometimes do pick more to dry or use later.
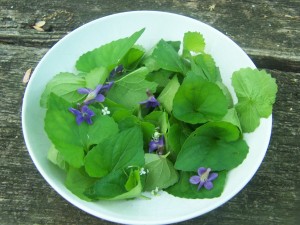
violet salad
garlic mustard and violet salad

Lately we have found the best wild edibles camping! Chickweed, violets, lambs quarters and garlic mustard make wonderful salads. We usually bring a bottle of salad dressing, but really these wild edibles are so fresh and delicious you could eat them plain! Above you will see one of my favorite simple camping salads for this time of year: garlic mustard green and flowers and violet greens and flowers.

These flavorful edibles also make a good trailside nibble if you get hungry on a hike.

Wild berries will be in season soon...those are always fun to nibble while camping!

wineberries
wild wineberries

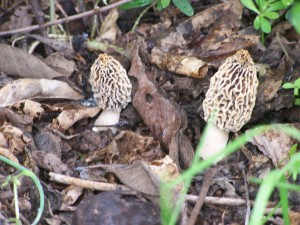
Other wild edibles such as morel mushrooms (below) and other edible mushrooms and nettles are excellent sauteed, and can be eaten over rice or pasta.

morel mushrooms
morel mushrooms

Burdock roots are excellent cooked into soups or with rice, giving a rich earthy flavor, and the burdock leaf stem is excellent steamed or boiled.

Some wild edibles you can find while camping are great as medicines, too. If you get stung by a bee look for plantain (some call it fairy bandaid) to chew and place on the sting.

If you get stung by nettles, you'll likely find burdock or yellow dock leaves nearby...chew those and apply to the nettle sting.

Poison Ivy? Look for jewelweed, crush and apply this plant to your itchy rash. Plantain will also work to take the itch away.

Wild edibles are full of nutrition and medicinal properties and are excellent to use while camping!

We'll be sure to bring you more camping adventures as the season progresses. Make sure you let us know about your camping wild culinary adventures as well!

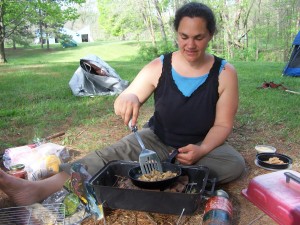
woman cooking morels outside
Melissa cooking morels over a camp stove


~ Melissa Sokulski

Wednesday, May 4, 2016

Garlic Mustard Pesto

Garlic Mustard is an invasive plant, brought to America as a culinary herb in the 1860's. Many local and state parks have volunteer days spent pulling this invasive herb out. By all means pull it up from your garden...but don't be so quick to throw it in the compost! This is a delicious plant and early spring is when its flavor is at its best.


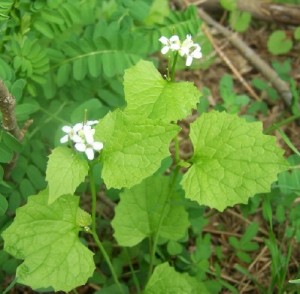
The leaves become bitter as the weather gets hot, so they are best collected in early spring and summer. Leaves can be collected either from the ground rosettes (pictured above) or from the stalk. Garlic Mustard leaves become more triangular when the plant bolts, and the leaves come up the flower stalk of this small four-petaled flower (unlike dandelion, whose leaves stay on the ground as the flower stalk is sent up).


Notice the 4-petaled white flowers blooming at the top of the plant. The leaves climb up the flower stalk and become more triangular once the plant flowers. 

You can eat garlic-mustard leaves both before and after it flowers. The leaves, flowers, and root are edible (the root tastes like horseradish!)

Flowers and chopped leaves can be added to salads for a nice pungent garlic flavor.

One of my favorite ways of eating garlic mustard is making pesto. Use your favorite pesto recipe and swap garlic mustard for fresh basil. If you don't have a recipe on hand, try this one. Pesto can be enjoyed on pasta, spread on crackers or tomatoes, on sandwiches, pizza..any way you can think of!


Garlic Mustard Pesto

* 2 cups garlic mustard leaves, washed and patted dry
* 1 small garlic clove, peeled
* 1/4 cup olive oil
* 2 Tbsp pine nuts, lightly roasted on stove top (can roast walnuts in place of pine nuts)
* 3 Tbsp grated Parmesan cheese
* 1 Tbsp lemon juice
* sea salt to taste

In a food processor, blend garlic and garlic mustard while drizzling in olive oil.

Add pine nuts, cheese, lemon juice and a little salt and blend.

Taste and add salt if necessary.

I mixed some into gluten-free pasta with more roasted pine nut and a chopped tomato. It was excellent!

Here's to wild foods!

Melissa Sokulski
Food Under Foot


Monday, May 2, 2016

Wild Mushroom Soup

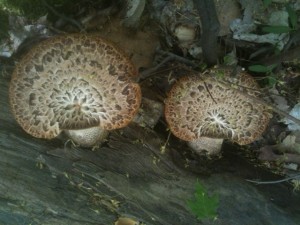
This is a great time of year: Morel Mushrooms! And while you are out looking for morels, you may find some gorgeous dryad saddles, growing on dead wood. Here is a delicious, vegan "creamy" wild mushroom soup that incorporates both (but you can really use ANY mushrooms in this soup!)


soup

This  amazing vegan "cream" of mushroom soup...and the mushrooms are MORELS and DRYAD'S SADDLES! It doesn't get better than this!


morel mushrooms


Vegan Cream of Wild Mushroom Soup

vegan, gluten-free, soy-free

In a pot with water, boil:
  • 3 potatoes, peeled, chopped
  • 2 carrots, chopped
  • 3 stalks celery, chopped
  • 1/2 onion, chopped
  • 4 cloves garlic
  • 5 button mushrooms (optional)
  • salt
  • pepper
  • paprika
Boil until POTATOES and CARROTS are tender. Remove from heat.
Add 1/4 cup raw CASHEWS or cashew pieces and blend well. (We used our vitamix, but any blender should be fine.)

In a pan with olive oil:

saute chopped MORELS with salt.

In another pan with olive oil:

saute chopped DRYAD'S SADDLE with salt.

wild mushrooms

(I sauteed in them in two separate pans because later in the season dryad's can become bitter, and in case this had happened, I didn't want to ruin the batch of morels!!! But they were just fine.)

Return now creamy broth to pot and adjust seasonings: SALT, PEPPER, PAPRIKA  to taste.
Add sauteed mushrooms and enjoy.

PLEASE MAKE 100% CERTAIN OF IDENTITY OF ALL WILD MUSHROOMS USED!
~ Melissa
Food Under Foot

Saturday, April 30, 2016

Let's Make Dandelion Tea Cake

cake

Originally called "Dandelion Bread," I changed the name of the recipe to Dandelion Tea Cake, because this is much more cake-like than bread-like (think Zucchini Bread.)

The original recipe is from the Food Storage and Survival Blog.

I altered it a bit to make it gluten-free, dairy-free and practically oil-free.

dandelion flower petals

First you'll need to gather a lot of dandelion flowers, which shouldn't be too hard this time of year! Then pinch off the green underpart and toss the yellow petals into a bowl. It's ok if there is a bit of green here and there, but the greens are bitter, so the more you can remove the better.

Ingredients:
  • 2 cups buckwheat flour (I ground buckwheat grouts in a coffee grinder)
  • 2 tsp baking powder
  • 1/2 tsp salt
  • 1 1/2 cups dandelion petals
  • 1 mashed banana with drizzle olive oil (I used in place of 1/4 c veg oil)
  • 1/2 c maple syrup
  • 1 egg, beaten
  • 1 1/3 cup cashew milk
  • 1 tsp vanilla extract
Directions:
  1. Preheat oven to 400 Fahrenheit.
  2. Mix dry ingredients, including dandelion petals, into bowl.
  3. Mix wet ingredients in another bowl, then combine with dry ingredients.
  4. Pour into oiled loaf pan.
  5. Bake at 400 for 25 minutes, then turn down heat to 350 and bake 20 more minutes.
Delicious served warm with tea. I boiled the extra dandelion flowers (greens and all) into a tea, to which I added a little honey.
I ate it plain, but it is also good topped with honey or butter.

cake with honey

Tea Time!!!
Happy Foraging!
~ Melissa Sokulski
Food Under Foot

Thursday, April 28, 2016

Juicing Japanese Knotweed

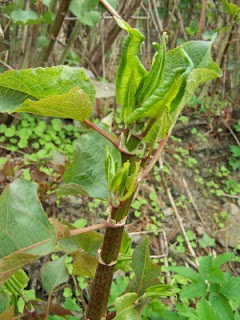
Today we found another big patch of Japanese Knotweed (Polygonum cuspidatum, or Fallopia japonica) in our neighborhood, and we decided to try juicing it!


japanese knotweed

Here is a closer picture of the shoot coming up out of the ground. You'll notice the many joints (poly = many, gonum = knees) along the stalk.
knotweed stalk

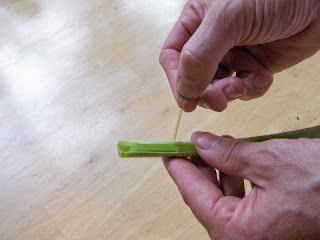
We stripped the heart shaped leaves from the stalk, which is the part we wanted to juice. The stalk is mottled, or speckled with red, and hollow:

hollow stalk

The stalks can be peeled, which is definitely recommended if you are eating it raw, or even preparing it by steaming. The outer part is very stringy and tough.

peeling knotweed

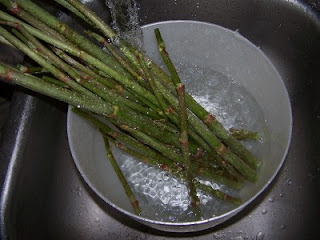
Since we were putting them though a juicer, though, we did not peel all the stalks. Here they are in the sink being washed:

knotweed stalks

Here is Ella juicing them:

girl juicing knotweed

The result was a vibrant green tart tasting juice. It would have been fine to drink on it's own, but we added some juiced apples. Though the apples we added were red (gala, I believe) the result tasted exactly like juice from Granny Smiths - very delicious!

knotweed juice

Japanese Knotweed contains resveratrol, which is a beneficial nutrient for the heart and brain. Resveratrol is what makes drinking red wine beneficial, though there is more resveratrol in Japanese Knotweed than red wine. The resveratrol supplements are usually made using Japanese Knotweed. The concentration is highest in the roots, but is still present in the stalk.

People have also begun using Japanese Knotweed as prevention and/or treatment for Lyme's disease. For more information on this check out Stephen Herrod Buhner's book Healing Lyme, which you can find, along with other information about Japanese Knotweed and Lyme disease, at his website, Buhner Healing Lyme.

Now is the time to harvest Japanese Knotweed, if you are interested in steaming, munching on, or juicing the stalks! Best to get them as young shoots, before they become tough and woody, which will be in about a month.

Enjoy!

~ Melissa Sokulski

Tuesday, April 26, 2016

Making Dandelion Wine

dandelion flowers

It's that time of year again! Dandelion flowers popping over playgrounds, yards, and hillsides! Find your favorite patch that is far from car traffic, spraying and fertilizing and pick those blossoms. If you want to make wine from them, here is another "vintage" post from the old blog, giving step-by-step instructions of how we did it.

glass of wine

The wine itself turned out very sweet, but also delicious! It will be ready to drink on the Winter Solstice - yum!

We are in the process of making dandelion wine! Or should I say...the wine is made, it just needs to ferment some more before we cork it and let it rest until winter solstice.
I read quite a few recipes for how to make dandelion wine, and solicited your favorites. I combined them together to do what I did.

dandelion flowers in pot


Ingredients:
  • 1 gallon dandelion flower heads (I kept the green "collars" on, I read to do it both ways (pulling the yellow petals off of the green necks and just using the petals...I used the whole thing.)
  • 1 gallon water (I was going to use more but it turned out both my largest pot and largest crock could only hold a gallon, so that's what I used.)
  • 3 lbs sugar (organic sugar cane is what I used.)
  • 1 packet yeast (photo below)
  • 2 organic oranges, with rinds peeled and saved, the orange sliced (photos below)
  • 1 organic lemon, with rinds peeled and saved, lemon sliced (photo below)
  • handful of organic raisins
  • 1 cinnamon stick
  • 1 Tbsp whole cloves

Directions:

Boil a gallon of water and pour over the dandelion blossoms. Cover loosely and let tea steep for 2 days.

Strain tea (reserving liquid of course! You can compost the flowers at this point) and return to the stove. Add 3 lbs of sugar, lemon and orange rinds, cinnamon and cloves. Bring to boil and simmer for about an hour.

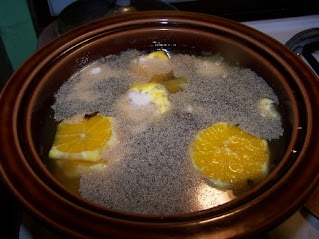
Pour from pot into crock and add the sliced oranges, lemons and raisins.

citrus floating in water

citrus and raisins


Once it has cooled to body temperature, sprinkle a packet of yeast on top.

packet of yeast


yeast floating on liquid


Cover with a cloth and let sit 3 days to a week (I did 3 days). When you put your ear close to it you can hear it fizzing (crackling.)

covered pot


 Strain (reserving liquid!!!!). I first strained it through a colander to get the big stuff out, then strained it through two jelly bags.

Let sit another day, covered with the cloth (will let extra "stuff" settle to the bottom.)

Pour into bottles, leaving some room at the top. Cover bottles with balloon which will indicated (by inflating) that quite a bit of fermentation is still taking place. Poke a pin hole in each balloon so that it doesn't get too full and pop or fly off the bottle.

bottles of fermenting wine


Once the balloons stop inflating, you can cork the bottles and store in a cool dark place for at least six months.

glass of dandelion wine


Cheers! Enjoy!!!

~ Melissa